DIY 9-Watt Field Lamp
(Note: The instructions on this page are for a 9-watt lamp. I've also added instructions to build an 18 watt lamp here. Both builds are the same except the 18 watt lamp uses a bigger housing and two lamps.) Read these instructions first; the 18-watt page is mostly pics.
This is a great project for someone who is just a little bit handy. It really doesn't require much in the way of special tools, uses mostly common off-the-shelf components, and can save you a bunch of money (as well as result in a rugged light as powerful as any on the market today).
The hardest part to find is the Hoya U-325c filter. The most complicated tool used is a Dremel, but - if you're creative - you can probably get away without even that.
For under $85.00 total parts cost you can build a 9-watt lamp that will provide years of use in the field. Comparable commercial lamps cost anywhere from $290 to $490.
Make sure you read completely through the instructions first so you have a good idea of what's required. Then follow step-by-step. You may decide to use a different light - should not be a problem, the general concept is the same. Just make sure whatever light you decide to use actually works with the UVC bulb (test it before you dig in).
Parts
This is a list of parts I use to build these lights. It is current as of May 2014 but as everything on the net, sources may come and go. You should be able to find an alternate source using Google if one of these listed no longer carries the item.
Lights/Housings
OEM 13-Watt Fluorescent Light - single tube light. Shop around - these have gotten hard to find...
OEM 26-Watt Fluorescent Light - double tube light. Same story as above - The manufacturer is here...
Another brand of lamp that is easily modified is the Bayco SL-975/976. The lamps are black and rather sturdy also. They are sold by many outlets.
Designers Edge L1920 13-Watt Fluorescent Work Light (Amazon) - a single bulb enclosure similar to the one I show here, just not the same quality. They also sell a two-bulb unit.
I have personally built and tested lights based on the OEM housings (the first two) so I know everything works fine. Being aware of Murphy's law, please verify that the UVC bulb works in any other light you decide to use before you go to all the work modifying it (it's conceivable that some cheap Chinese knockoff may not have a powerful enough ballast).
UVC Bulbs
I use either Phillips or Ushio 9 watt compact fluorescent UVC bulbs - 9W CFL G23 BASE, UV-C LAMP GPX9 GERMICIDAL LAMP. These are available from many different vendors; I buy from AtlantaLightBulbs.
Standard off-the-shelf bulbs are used; no modifications to the blubs are necessary.
Hoya Filters
This is the hard part. You can try and contact Hoya directly and talk them into selling a custom cut (size depends on what light you decide to modify). The material you want is Hoya U-325C.
I have contacted Hoya directly and the last information I have (late 2016) is that they are willing to sell small qty to individuals, custom cut. Contact information:
HOYA Corporation USA
Optics Division
680 North McCarthy Blvd, Suite 120
Milpitas,CA 95035-5120
Email: Sushama.apte@hoya.com
Phone#: 408-654-2273 Fax#: 408-654-2270
Mobile# 408-674-0214
Website: www.hoyaoptics.com
Everything else should be available at your local hardware store (Krylon paint, AC plug, etc).
AC versus DC
The lamp modification described here is based on an AC lamp. This means it requires a DC to AC inverter for use in the field. If you read my FAQ on Field Lamps you probably noticed that I don't particularly endorse this arrangement; a third component is just another thing to carry and break.
While this is true, there are sometimes good reasons to compromise.
Most of the lights I build are DC driven - they hook directly to a battery. These lights are considerably more complex to build; the internal ballasts must be ripped out and replaced by a DC ballast, power switches must be replaced with high-current DC switches, and fans installed to handle the extra heat. I have the technical skills to do all that (and more - I add LEDs for UV and white light, battery monitors, etc). But the average tinkerer is not going to be able to tackle such a project.
This light is nowhere near that complicated; you don't even have to open up the base with the electronics. And - since the light is AC-powered, it can be used at home by just plugging into the wall. I've found a small DC to AC inverter that is ideal for driving these AC lamps (and cheap). I recommend replacing the cigarette lighter connector with a quality connector (such as Anderson PowerPoles - details in instructions to the right) but all-in-all, for average use an inverter will work just fine.
Build your own Portable 9-Watt UV Lamp
DIY Instructions
Tools Required: Screwdriver, nut driver/wrench, Dremel (or a hand saw to
cut plastic), wire cutters, black plastic paint.
Construction time: 2 hours (not including painting time)

OEM 13-Watt Fluorescent Light - $39 at Walmart (as of May 2014)
Same lamp modified using these instructions
You can use several different worklights as the foundation for this project. I choose the OEM 13 watt light pictured above for this DIY project because it was the highest quality package I could find, with metal protection for the lens assembly, a very rugged enclosure, and simply great looks. The same company also makes a 26 watt - two tube - version for more $$$, same style packaging (I use that in my higher end fully customized lights). A couple of other companies make housings which will work nicely too: Designers Edge, Bayco, as well as a whole bunch of cheapies from China.
The first thing I would do is shorten the AC power cable. It's about 15' long and we just don't need that length or weight, and if we shorten it now, that less cable to deal with while modifying the light. We'll put an AC plug back on later. Of course, if you want a long cable just leave it as is. This brings up another issue which I'll address briefly now, more later:
This lamp is AC powered. Although not my first choice, it is the simplest way for the "Do-it-yourselfer" to build a light. It can be powered simply by plugging into an ordinary 110v will socket (great for use at home), or in the field by a DC to AC power inverter (included in this project description and cost estimate), using a 12vdc battery. (See left sidebar)
The hardest (and most expensive) part to find for these lamps is the Hoya U-325c UV bandpass filter. As of April 2017 Hoya has quoted these filters direct from the factory. A 6.5 square piece of glass was quoted at $178.25 plus $11 shipping. This is more than enough glass to do 3 of these lamps. They are even willing to custom cut to your measurements. This is a great price - around $4 sq in. Contact details:
HOYA Corporation USA
Optics Division
680 North McCarthy Blvd, Suite 120
Milpitas,CA 95035-5120
Email: Sushama.apte@hoya.com
Phone#: 408-654-2273 Fax#: 408-654-2270
Mobile# 408-674-0214
Website: www.hoyaoptics.com
Let's begin!

Remove the top of the light so we can access the bulb - remove two black screws.
top-removed.jpgTop removed (2 black screws), showing the nuts retaining the lens assy in place.
Remove these nuts, pull off the red plastic retaining cover, and remove the clear lens assy from inside the metal protectors. I would remove the "C" clamp holding the hanging hook and throw the hook away. The large hole functions nicely as a cooling vent.

Remove and discard the white light fluorescent bulb that came with the lamp; we'll be replacing it with a UVC bulb (be green - mercury lamp). Pictured above are all of the individual components. Set everything aside while we ready the clear plastic lens assy for mounting the Hoya filter.

This might be a good time to note the difference between the two fluorescent bulbs. Note that the clear UVC bulb is shorter than the white light blub we are throwing away. There will be more on this later.

Then slip the clear lens assy back into the metal protectors over the UVC lightblub. Now look at the end - you should see something like the pic below:

This pic might look a little strange - bear with me. Note that the clear plastic lens assy has two ridges in either side. These held the reflector material in place (the plastic reflector you just removed). They should be lined up horizontally with the bulb (note the green line). We will cut a hole in the lens assy so that the Hoya filter sits approximately where the purple rectangle is shown (the red zig-zag shows where the plastic will be cut out. Ultimately we will glue the Hoya filter glass directly to the lens assy. Using a marker, mark the are to be cutout. Be sure that the filter is mounted high enough so it will clear the fluorescent bulb, yet still fit inside the metal protector cage.


I put 3M quick release painters tape on the marks and use the tape as a cutting guide. Note the rectangle I've outlined. My Dremel has a plastic cutting wheel, but most any cutting wheel will work fine as long as you don't go too fast and just melt the plastic.
I carefully follow the tape lines and cut out the rectangle. The center just pops out and I use a trim knife to deburr the edges.
If you don't have a Dremel, it would probably be pretty simple to just drill four holes (one at each corner) and use a rope saw (the kind used to cut PVC pipe) to cut along the lines while somebody holds the piece for you.
You don't have to be too neat here; the filter will be glued into this opening and we'll use plenty of black silicon to cover up any rough edges.

Your lens assy should now look something like this. Deburr the edges with a sharp kinfe/razor and wash the plastic cutting dust off thoroughly. The next step is to paint the lens assy and dirt just won't be good.

Clean the lens assy with alcohol (the purer the better - leaves less residue). Alcohol gets off all the greasy fingerprints, oils and other contaminants that might mess up a good paint job.
Paint it black, just like the song. I use Krylon plastic paint - lots of coats. I paint both the inside and the outside. That way minor imperfections/misses are covered up by one side or the other. Don't skimp on coats - the more the better, and be especially aware of the areas around the ribs on the inside of the lens assy - it's hard to get paint into all the crevasses.
I allow 20 minutes between coats (lots of coats!). When you think you're done hold it up to a bright light and make sure no light bleeds through. Let it dry overnight.
The Hoya Filter
This is probably going to be the hardest part of the whole project - getting your hands on a filter, cut to the right size. Filters are sold by Hoya Optics (Japan) - single source vendor. They used to sell custom cut small quantity pieces so I would check with them (contact info in side bar).
I salvage my filters from surplus transilluminators which I upgrade to powerful UVC display lights (see Transilluminators - DIY). For the handheld portable lights I build, I cut one of these large filters (typically 8" x 16") into smaller filters suitable for the current batch of lights I'm building. The filter material is "like-new" and works wonderfully. I cut the glass with a (wet) diamond saw as I am not comfortable using a glass cutter, and I don't have a waterjet.

This shows the painted lens assy with a Hoya filter cut to size, and a white reflector.
Before gluing the filter onto the lens assy the reflector must be mounted. Specular aluminum is available from aquarium supply houses, Grainger, (or maybe hydrophonics operations?). Just make sure what you use is not coated with a UV protector. (The original plastic reflector that came with the lamp is a template to cut the new reflector. Once the new reflector is cut, just throw it away (it's useless, doesn't reflect UV)). I've used plain old aluminum foil as a reflector - just slap a thin coat of silicone glue on the back and glue it into the lens assy; my test results show it almost as good as specular aluminum (but I've not done any longevity testing - will UVC destroy it?). Whatever you use, make sure it's curved and mounted securely before proceeding to the next step.

Gluing - I hate this part. It's messy and I invariably get glue everywhere. I use black silicone high-temperature glue (found in the automotive section at Walmart, Autozone, etc). I first tack the filter down using four little spots of glue and let that dry. Once the filter is firmly in place I put masking tape everywhere so I can pull it off after I've applied a liberal amount of glue along all the edges of the filter. This gives a nice clean look to the glue job. Have alcohol on hand and be ready to use your finger to smooth out the glue (use lots of alcohol on your finger tip, but don't press too hard). I apply plenty of glue to be sure to seal all the gaps. Carefully pull the tape off as soon as you finish applying the glue - while it's still wet. You should have neat straight edges. Carefully set it down to dry - remember that it is a round cylinder that is now very top heavy; it will roll so place it between something (plier handles?) that will prevent it from rolling and messing up your glue job. Let it dry overnight, check for missed gaps the next morning and reseal with a dab of glue on the inside if possible.
Final Assembly

Now that the lens assy is painted and the filter glued on it's time to put it all together. To allow some cooling airflow I drill a few holes in the endcap - just compare the pic to yours and you'll see where to put them. Don't forget to drill some holes in the standoff.
I also added a 1/4" spacer on the end of the silicon bulb retainer. I don't think any of this is absolutely necessary, but if you have a small drill go ahead and do it. I also drilled one small hole at the bottom of the lens assy (closest to the on/off switch - not shown). This will allow some air in the bottom, as well as give off a little bit of visible light (a "lamp on " indicator). I also removed the hanging hook to allow for more airflow out the top.
When you're ready, insert the bulb into the lamp socket, carefully slide the lens assy over the bulb and between the metal guards and put the silicon retainer on the end of the bulb. Make sure the lens assy is rotated so that the bulb is parallel to the filter.
Next, place the end cap over the metal guard studs (plastic standoff points outward). Line all the studs up (a little tricky) and push down - you may have to pull the guards out of the bottom holder a little. Carefully thread the nuts loosely onto each guard. Verify that the lens assy is seated flush to both the bottom and top red plastic holders and tighten the nuts, alternating like you would the lug nuts of a car tire. Then screw the top with the hanger on (two black screws).
 If you shortened the AC cable, it's now time to install an AC plug (any hardware store/Walmart). Plug it in and turn it on. Verify that the light is lit (why wouldn't it - we didn't even open the bottom part).
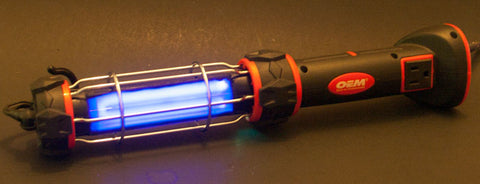
The image to the left shows light leaking out the two vent holes I drilled. In my final version I also left off the hanging hook, allowing even better airflow. If too much light is escaping, a little steel wool stuffed in the cavity works nicely as a light blocker, but still allows airflow.
That's it - you now have an AC powered lamp. Next I'll cover using the DC to AC inverter.
DC to AC Inverter

A DC to AC inverter converts battery voltage to 110vac (needed to drive this lamp). There are many brands and makes available. I picked one I liked for several reasons. It is made by "Bestek" and sells on Ebay for $19.00. As of this writing you can find it by searching for "200W DC 12V to AC 110V power inverter Car Adapter Charger Converter".
200 watts may seem over-powered for this application, but I have learned the more the better. Make sure your inverter supplies 200 watts and a significant surge capability. The inverter is small (about the size of a large pack of cigarettes) and has plenty of oomph. It also has a couple of USB ports for charging a phone or powering a notepad. That might come in handy. So small, lightweight and powerful - that's all I need (and the price was right - $19.00).
It comes with a cigarette lighter connector. I hate them. They are unreliable, fall out of sockets, and have unnecessary fuses to blow. But - I guess you can use them just like every other commercially available lamp; they match up with lots of batteries, and you won't have to do any work to change them out.
But I cut them off and install Anderson PowerPole connectors. All my batteries and all my other lamps have this connector. I find it very reliable. But be aware, you must know how to crimp properly, or better yet solder the wires into the new Anderson connectors. And the cable to the battery should be 18AWG minimum, 14AWG even better. DO NOT ATTEMPT to rewire your connectors unless you are very familiar with soldering/crimping and understand DC polarity and wiring. Use 18AWG wire - inrush currents can exceed 6 amps (if you don't understand what I am talking about, don't mess with the wires).

Above is the complete setup (with my Anderson connectors). A 2.5AH battery is powering the inverter which in turn provides 110vac to the light.
The whole contraption (the light powered by the inverter) draws about 1.4A. This means a 2.8AH (amp hour) battery will light the light for two hours. The battery shown powering the setup above is 2.4AH (Super NiMH) and will drive this light constantly for just under two hours. But the way I use it (intermittent on/off duty cycle) I would expect it to last a lot longer. Of course I always carry spare batteries, or if I know I'm going to be out all day I carry higher amperage LiFE battery packs (see the section on batteries).

I can even revert back to a cigarette lighter connector if I go insane someday....
If you must use a lead-acid battery, here's one that works for the 9w lamp: http://www.batteryspace.com/on-the-gopowerpack120v32ah38whslabatteryinbeltbag08asmartchargerforanyportabledevices.aspx - it comes with a carrying pack, charger, and 3.2AH battery for $43.00. It will run the 9w lamp for around two hours. The coiled cord is too flimsy and must be replaced with a short heavy-duty DC power cable (at least 18AWG). But - my 2c - be smart and go with lithium phosphate direct replacement for lead-acid w/ hefty wiring. NOTE: This battery is underpowered for the 18w lamp. I really recommend lithium - higher voltage, more power, and more amps.
