Building Your Own Transilluminators - DIY
Rough instructions on how to upgrade your own transilluminator
Please do not attempt to do this on your own unless you are an experienced "tinkerer"/do-it-youselfer. I cannot provide customized detailed instruction remotely and will not help you burn your house down. These hints should be enough to get the experienced person started.
Please read the OVERVIEW section before proceeding with the DIY projects shown here. Make sure you purchase a transilluminator that is suitable for upgrading.
Here are some tips, parts lists, and random photos to assist the somewhat technically capable to convert a surplus transilluminator to a killer UVC death ray. (Make sure you read the overview of transilluminators before you read this.) You won't need much more than a screwdriver and the ability to follow directions. A little wiring knowledge is helpful. If you've never replaced a fluorescent lamp or used a wirenut this is probably not a project for you. OTH - you don't need to be an engineer to modify a unit; heck - I've even shown my favorite shrink how to do it! (talk about analyzing our hobby)! To start you need a used transilluminator. These are available on ebay as surplus and I usually pay around $250 or less (just be patient and you'll win one). My favorites are those made by Fotodyne and Fisher Scientific. I'll show a bunch of photos below describing the upgrade from both of these units.
Parts: In addition to the transilluminator, you'll need a few new parts:
-
Bulbs - either 4 or 6 each 25 watt UVC bulbs for a simple upgrade, or 4 each 55 watt "U" tubes for a killer death ray (220 watts total)
-
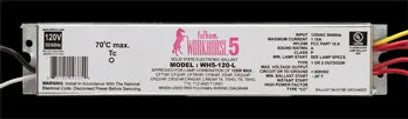
Ballasts - I use Fulham Workhorse 5 (WH5). Each drives up to 120 watts of tubes, so you may need two if you're driving more than 4 bulbs or the larger "U" tubes
-
Lamp standoffs for "U" lamps
-
Wire nuts
-
Specular aluminum reflector (optional)
Sources:
- http://www.atlantalightbulbs.com for the tubes and ballasts (that's what I use)
- Aquarium supply houses for reflector material
- Ebay for "U" tube standoffs
Hopefully you're resourceful enough to search stuff out yourself and make good buys. This won't be a detailed step-by-step write up, but simply a summary of the steps required and a direction to take for the non-engineer.

This is a 4 bulb Fotodyne transilluminator - 4 * 15 watts = 60 watt total. The simplest mod would be to change out the existing 15W MW bulbs with 15 watt UVC bulbs, put the cover back on and - voila - you have a 60 watt UVC display light. (Same story if it's a 6 bulb unit - just change out all 6 bulbs). The resulting light has a huge filter area and will throw UV over a broad area. For under $300 you would have one of the nicest display lights around. (Use F15T8 bulbs)

You could add a specular aluminum reflector for a little more UVC output (or perhaps just glue some aluminum foil on the white surfaces?) Want to mix/match? Keep a couple of the old MW bulbs and alternate with SW bulbs (or buy new ones as we have no idea how worn out the old bulbs are). But - you can do so much more!
Change the existing 15 watt design to a 25 watt design.
Remove the lights. Unscrew the white metal reflector and strip out the heavy 15 watt magnetic ballasts, all the wiring associated with those ballasts (just cut the wires at the ballast; leave them connected to the sockets).

If you're going to use 25 watt linear bulbs leave the sockets mounted to the mounting rails and just let the wires dangle (you'll use those later). Throw away the heavy magnetic ballasts. Clip the wiring going to the fan and the power switch for later use. (Pic below shows the original parts being gutted.)

Mount the new Fulham electronic ballast (one if only driving 4 lamps, two if driving 6 lamps; one Fulham ballast can drive up to 120 watts total - or 4 25W bulbs; for six bulbs you'll need two) and wire according to the diagram below (if driving 6 lamps, connect three to each ballasts and wire like below - just one less lamp per ballast).

Reinstall the white reflector panel (or a new aluminum panel purchased from an aquarium supply house and bent/cut to fit). Wire up the AC and fan, install the lamps - and voila - you now have a 100 watt (or 150 watt) death ray!
NOTE! These transilluminators are designed to be operated filter side up. Many have the filter glued in place and continuous operation may heat and loosen the glue allowing the filter to fall out when mounted upside down. Install a couple of screws and washers, or retaining brackets, to hold the filter in place.
Note: some transilluminators have switches wired in weird ways. Simplify it and run the wiring as above... I don't show the fuse that all transilluminators will have (sometimes they have two - one for each side of the incoming AC line). Just make sure you keep the fuse in the wiring (before the on/off switch) for protection.
Random Photos

Shows the layout for 4ea 60 watt "U" tubes to make a 240 watt monster (PL-L60W/TUV HO/4P ) Of course you'll need two WH5 ballasts to drive this.

Wiring of the 2G11 connector (one for each "U" tube). Note the wire loops to tie the filaments together for rapid start operation.

This shows a unit I built with 6 each 36 watt bulbs - lots of ways to do it....

2G11 connectors prewired for rapid/instant start operation.

A (sloppy) view of the wiring for 3 each "U" tubes

Here I installed 4 each 60W "U" tubes (240 watts of UVC) and one 25 watt MW tube. Greenland minerals often appreciate the addition of a MW "kicker" to make the sodalite pop. Works great for lots of calcites too....
